
Boost Amazon Sales with A+ Content: A Seller’s Step-by-Step Guide
If you’re serious about increasing your Amazon conversions, building brand credibility, and standing out in competitive niches, A+ Content is your secret weapon. In this guide, we’ll walk through what A+ Content is, how to create it effectively, and which modules work best—complete with a real product example and tips for designing infographics with Canva.
What is A+ Content on Amazon?
A+ Content allows Brand Registered sellers to enhance their product listings with additional visuals, formatted text, and comparison charts. It appears in the “From the Manufacturer” section and is one of the most powerful tools to boost conversions by educating customers and visually differentiating your product.
Benefits of A+ Content include:
- Higher conversion rates (5–10%+ on average)
- Increased customer trust and reduced return rates
- Improved SEO via backend metadata
- Stronger brand storytelling
Example Product: Collapsible Silicone Lunch Box
Throughout this guide, we’ll use a Collapsible Silicone Lunch Box as our example. This product combines eco-friendliness, portability, and meal-prep convenience—making it a great fit for rich, benefit-focused visuals and explanations.
Step 1: Plan Your A+ Content Strategy Around Customer Questions
Before designing anything, ask: What does a customer need to know to confidently buy this product?
- What makes it different from cheaper lunch boxes?
- How does it collapse, and how much space does it save?
- Is it safe for kids? Microwave-safe?
List these questions and plan one section of A+ content for each. This ensures your content answers objections and drives conversions.
Step 2: Choose the Right A+ Content Modules
Amazon offers a variety of modules. Here’s how to use them strategically:
- Standard Company Logo (Standard Text/Headline with Image): Start with your logo and a trust-building statement like “Trusted by 20,000+ Families.”
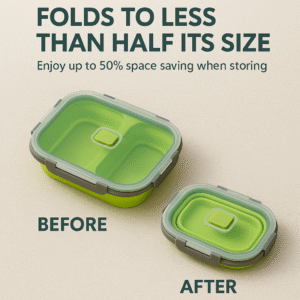
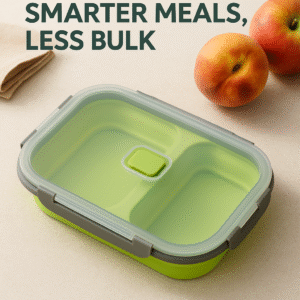
- Standard Image and Light Text Overlay: Use this to highlight a hero image with your top benefit (e.g., “Collapses Flat in Seconds”).
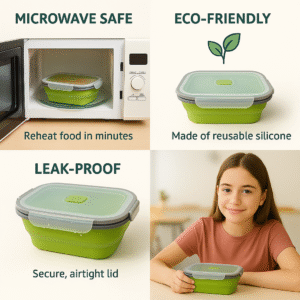
- Standard Four Image/Text Quadrant: Explain key benefits such as “Microwave Safe,” “Eco-Friendly,” “Leak-Proof,” and “Kid-Friendly.”
- Standard Comparison Chart: Compare your lunch box to traditional Tupperware, showing advantages in size, durability, and safety.
Pro Tip: Don’t overuse modules—stick to 4–6 with high-quality visuals and focused messaging.
Step 3: Design Eye-Catching Infographics with Canva
You don’t need Photoshop skills to make professional visuals. With Canva, you can quickly create A+ graphics that look amazing and convert well.
Here’s how to do it:
- Go to Canva.com and choose “Custom Size” (970×600 px is a good base for A+ images).
- Search for templates with product mockups, infographics, or lifestyle layouts.
- Upload product photos and add icons, arrows, and benefit callouts.
- Use your brand colors and fonts for a consistent look.
- Download in PNG format and upload to Seller Central.
Example for Our Collapsible Silicone Lunch Box:
Step 4: Write Benefit-Focused Copy for Each Section
Your visuals grab attention, but your text seals the deal. Each module should have a clear headline and 1–2 short sentences that drive home the value.
- Don’t say: “Made from high-grade silicone.”
- Do say: “Built from food-grade silicone to keep your meals safe and your kids healthy.”
Remember, speak to what your customer cares about. Safety, ease of use, and space-saving all matter more than technical details.
Step 5: Upload and Publish in Seller Central
Once your content is ready:
- Go to Seller Central → Advertising → A+ Content Manager.
- Click Create A+ Content and choose “Enhanced Product Description.”
- Add your modules, upload your images, and insert your copy.
- Submit for review. Approval typically takes 1–2 business days.
After it’s live, monitor your listing’s conversion rate in your business reports. Expect a lift within 1–2 weeks.
Pro Tips for High-Converting A+ Content
- Use lifestyle imagery: Show the product in real-world scenarios (e.g., kids using the lunch box at school).
- Use arrows and callouts: Direct the eye to key product features in your images.
- Stay mobile-optimized: Keep text large and concise for small screens.
- Tell a story: Walk the customer through the journey—problem, solution, transformation.
Conclusion: A+ Content is Your Conversion Engine
If your Amazon listing feels flat, A+ Content is how you bring it to life. It’s more than just visuals—it’s your best tool for answering objections, building brand trust, and showing off what makes your product better. By using strategic modules, clear benefit-driven copy, and clean Canva-designed visuals, your listing can turn clicks into customers—consistently.
Next Steps:
- Map out your product’s key benefits and common objections.
- Choose 4–6 modules that align with your goals.
- Use Canva to design eye-catching images that reinforce your message.
- Upload, publish, and watch your conversion rate climb.

Kaleb started his Amazon journey as a data analyst for a wholesale beauty brand, where he helped grow their Amazon sales from zero to over $1 million per month. Since then, he’s worked directly with more than 100 sellers across a wide range of categories, focusing on growing their sales through expert account and inventory management, ad strategy, and catalog optimization. When he’s not working with sellers, you’ll find Kaleb enjoying life with his fiancée Jerah and their dog Clifford, his favorite team outside of Amazon.